Friday, September 17, 2010

Android Tools

Android Tools
The Android Software Development Kit for mobile applications comes with custom tools to enhance your application projects. While the Android Emulator and the Tools Plugin for the Eclipse Integrated Development Environment are must-have Android tools, others are also available for debugging your applications, packaging and installing them.

ANDROID EMULATOR

The Android Emulator installs a virtual mobile device on your computer. Use this Android tool to develop, test, and debug applications without the need for a mobile device. The Emulator simulates the function of a mobile device and allows you to run simultaneous applications.

ANDROID DEVELOPMENT TOOLS PLUGIN FOR ECLIPSE IDE

The Android tool plugin for Eclipse Integrated Development Environment increases speed and efficiency for developing Android applications. With this Android tool, your application projects are enhanced by accessing the DDMS tool from Eclipse. It also comes with a Wizard for new projects for creating the basic files, and a code editor for XML.

DALVIK DEBUG MONITOR SERVICE (DDMS)

The debugging Android tool, DDMS, works with the emulator or the mobile device. It detects the virtual machines and provides Info, Thread and Heap tabs for easy display. Other functions of the DDMS include port forwarding, screen capture, exploring processes, cause a garbage collection to occur, run logcat for dumpsys and dumpstate on the device, examine radio state, and stop a virtual machine. Note: The DDMS Android tool will crash an application running in a Sun Java desktop virtual machine.

ANDROID DEBUG BRIDGE (ADB)

Three core components of the ADB Android tool include a client, server, and daemon. The Android Debug Bridge is used to manage the state of an emulator or mobile device. It can also be used to copy and install an application from one computer to another emulator or device, to manage SQLite (included in Android tools) databases, and to enable logcat logging.

ANDROID ASSET PACKAGING TOOL (AAPT)

The IDE plugins can use this Android tool to package the .apk file. Developers can use it directly to view, create and update .zip, .jar and .apk archives and compile resources into binary assets.

ANDROID INTERFACE DESCRIPTION LANGUAGE (AIDL)

Using interprocess communication, two processes on an Android device can talk with the code generated by AIDL. This Android tool is interface based and saves developers the time used to write marshalling code.

TRACEVIEW

If you generate trace log data from Android applications, this Android tool will offer a graphical view of those execution logs.

MKSDCARD

The mksdcard is an Android tool that allows you to simulate an SD card plugged into a mobile device. The disk image is used with the emulator to mimic the presence of external storage.

DX

The DX converts .class files to the Android bytecode. This Android tool presents files in the Dalvik executable format, and can also present a people-friendly readable format.

ACTIVITYCREATOR

The activityCreator script comes in handy when not using Eclipse IDE and ADT plugin. Like the ADT New Project Wizard, this Android tool creates the basic files needed to get you started on Android application development.

Wednesday, September 8, 2010

Android Architecture and Android Components


Android Architecture
Applications
        Android will ship with a set of core applications including an email client, SMS program, calendar, maps, browser, contacts, and others. All applications are written using the Java programming language.
Application Framework
      The application Framework enable Android application to reuse and replace existent components.
The Framework include :

 ¨A rich and extensible set of Views that can be used to build an application, including lists, grids, text boxes, buttons, and even an embeddable web browser.

 ¨Content Providers that enable applications to access data from other applications (such as Contacts), or to share their own data.

 ¨A Resource Manager, providing access to non-code resources such as localized strings, graphics, and layout files.

 ¨Notification Manager that enables all applications to display custom alerts in the status bar.

 ¨An Activity Manager that manages the lifecycle of applications and provides a common navigation backstack.

Libraries
       Android system is based on set of C/C++ libraries used by various components of the android system.

Core libraries include :
¨System C library - a BSD-derived implementation of the standard C system library (libc), tuned for embedded Linux-based devices

¨Media Libraries - the libraries support playback and recording of many popular audio and video formats, as well as static image files, including MPEG4, H.264, MP3, AAC, AMR, JPG, and PNG

¨Surface Manager - manages access to the display subsystem and seamlessly composites 2D and 3D graphic layers from multiple applications

¨LibWebCore - a modern web browser engine which powers both the Android browser and an embeddable web view.

¨SGL - the underlying 2D graphics engine.

¨3D libraries - an implementation based on OpenGL ES 1.0 APIs.

¨FreeType - bitmap and vector font rendering.

¨SQLlite - a powerful and lightweight relational database engine available to all applications.

Android Runtime
            Every Android  application run by using  Dalvik virtual machine(DVK). The Dalvik VM executes files in the Dalvik Executable (.dex) format which is optimized for minimal memory footprint.

Linux Kernel
          Android relies on Linux version 2.6 for core system services such as security,  memory management, process management, network stack, and driver model. The kernel also acts as an abstraction layer between the hardware and the rest of the software stack.


Components
Activity
--- An activity presents a visual user interface for one focused endeavor the user can undertake.
--- Each activity is independent of the others. Each one is implemented as a subclass of the Activity base class.
---Each activity is given a default window to draw in.
---The visual content of the window is provided by a hierarchy of views — objects derived from the base View class. A view hierarchy is placed within an activity's window by the Activity.setContentView() method.

Activity Life Cycle
Activities in the system are managed as an activity stack.
An activity has essentially  three states:
1.If an activity in the foreground of the screen (at the top of the stack), it is active or running.

2.If an activity has lost focus but is still visible (that is, a new non-full-sized or transparent activity has focus on top of your activity), it is paused.

3.If an activity is completely obscured by another activity, it is stopped.
       If an activity is paused or stopped, the system can drop the activity from memory by either asking it to finish, or simply killing its process.


There are three key loops you may be interested in monitoring within your activity:


The entire lifetime of an activity happens between the first call to onCreate(Bundle) through to a single final call to onDestroy().
The visible lifetime of an activity happens between a call to onStart() until a corresponding call to onStop().
The foreground lifetime of an activity happens between a call to onResume() until a corresponding call to onPause().

      Service
                                    A service is designed to operate independently of the screen, thus of activities. The best example is the music player that can works while moving from one screen to another.
        Intent

The intents are the goals of applications and are made effective by a new screen. An intent is made up of an action and data that are
 URI.

Examples of actions: MAIN, VIEW, EDIT, PICK.
If one wants to see a card about a person, an intent is defined. The action is VIEW and the data is the URI which enables access to this card.

IntentFilters describes how the action should apply.

IntentReceiver is an object that responds to external events. It can operate in the application or it can start an application.


Content Provider
                            Data stored by a computer program, in the form of files or SQLite databases are private and may not be used by other applications.But Content Provider may be used to share data among several applications. The interface ContentResolver is the interface that provides data to other objects.
          Notification
                             The class android.app.Notification defines how an event must be notified to user: displaying an icon, changing state of a led, vibration, or others. While the class android.app.NotificationManager sends the message in the form so defined.


Tuesday, September 7, 2010

New to Android Application Development?

Step By Step Procedure to Install and Develop 1st Program

Step 1: Get Eclipse
For this tutorial, I’m going to use Eclipse, because frankly it’s the easiest and most hassle-free development tool for Android right now. If you’re a NetBeans programmer, be my guest; but I’ll use Eclipse today.
Note: This is a .zip file; when you unzip it you will be able to run it wherever you unpacked it – there is no installer. I’d recommend that you put this in “C:\Program Files\” unless you plan on making it a portable application on a USB drive or something.
Step 2: Download The Java JDK
If you don’t have it already, you need to download the Java JDK 6. If you currently have the JDK 5, you should be okay, but there’s really no reason not to update. Just install it by downloading and then running through the setup to get things going. I’d recommend that you just hit next–>next–>finish, rather than doing anything fancy. Once you get things working, you can mess around a bit.
Step 3: Download The Android SDK Tools
Next, you’ll need to get the Android SDK Tools straight from Google. Unpack and install this to a directory you’ll remember – you need to reference this in the next few steps.
Step 4: Configure Eclipse For Your Android
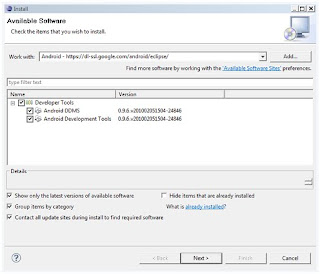
Start Eclipse, and head to ‘Help>Install New Software‘. Hit  “Add…” and for the name, type “Android” and set the link to “https://dl-ssl.google.com/android/eclipse/” (if this doesn’t work, try it with http:// instead of https://).Click “OK” and the following should appear.

Select both of the resulting packages, and hit next – this will download the Android ADT(Android Development Tools). Go ahead and start the download to obtain these two packages. Restart Eclipse (it should prompt you to on completion of the downloads). We’re almost ready to start coding.
Step 5: Configure The Android SDK
Navigate to the folder you downloaded/unpacked the Android SDK to. In there, you’ll find a file named “SDK Setup.exe.” Start that file – the following dialogue should appear.

Don’t feel obligated to download every single thing. Could it hurt? Not really. For me, however, I only really want to program for Android 2.1 and 2.01, so those are the only API packages I bothered to get (someday I may pay for my folly, but not today). Either way, get what you want (and you do need to pick one) and hit install. The SDK manager will install it for a little while – go grab a snack.
Step 6: Set Up Your Android Virtual Device (AVD)
Now that you’ve finished yet another painful download, click over to “virtual devices” (still in the SDK Manager). We’re going to create an Android device that will test run your programs for you! Hit “New” to create a new Android device, and put in the specifications that you want it to have. In the screenshot below, you’ll see the options I wanted 

Click “Create AVD” to–well–create your AVD. Select your AVD from the list, and hit “Start” to make sure that you do indeed have a working emulation of an Android phone. After a pretty lengthy start-up wait, it should look something like this.

Fool around with it and explore for a bit if you want, then close it up so we can get back to work.
Step 7: Configure Eclipse Again
Remember that Android SDK we got earlier? We didn’t do anything with it. Now, it’s time to tell Eclipse where it is so Eclipse can use it as a resource. To do this, open Eclipse and navigate toWindow>Preferences (or on Mac, Eclipse>Preferences) and select the Android tab. As shown below, browse to the location of your Android SDK and hit “Apply“.

Everything check out so far? Hit “OK” to save everything and ready to start our Application